


When developing database-driven .NET and .NET Core, regardless of the database we intend to deploy in the end, we will often want to work with a database engine that is lightweight and fast, in order to execute tests quickly and speed up development. Here SQLite is an ideal choice.
You can use SQLite to gain both faster data access and a smaller footprint. The SQLite database is usually stored as a single disk file, although it can also work as an in-memory database. However, unlike an in-memory database, SQLite allows you to query data without having to load the entire data set in memory.
Dapper—the open-source and lightweight “micro ORM” I’ve written about often— supports many databases including SQL Server, MySQL, SQLite, SQL CE, and Firebird. By using Dapper in your applications, you can simplify data access while ensuring high performance. In this article, we’ll examine how to work with a SQLite database using Dapper in ASP.NET Core applications.
To use the code examples provided in this article, you should have Visual Studio 2022 installed in your system. If you don’t already have a copy, you can download Visual Studio 2022 here.
Table of Contents
Create an ASP.NET Core Web API project in Visual Studio 2022
To create an ASP.NET Core Web API project in Visual Studio 2022, follow the steps outlined below.
- Launch the Visual Studio 2022 IDE.
- Click on “Create new project.”
- In the “Create new project” window, select “ASP.NET Core Web API” from the list of templates displayed.
- Click Next.
- In the “Configure your new project” window, specify the name and location for the new project. Optionally check the “Place solution and project in the same directory” check box, depending on your preferences.
- Click Next.
- In the “Additional Information” window shown next, select “.NET 8.0 (Long Term Support)” as the framework version. Ensure that the check box that says “Use controllers” is unchecked since we’ll not be using controllers in this project.
- Elsewhere in the “Additional Information” window, leave the “Authentication Type” set to “None” (the default) and make sure the check boxes “Enable Open API Support,” “Configure for HTTPS,” and “Enable Docker” remain unchecked. We won’t be using any of those features here.
- Click Create.
We’ll use this ASP.NET Core Web API project to work with the code examples given in the sections below.
Install the Dapper and SQLite NuGet packages
In this example, we’ll use Dapper to connect to and work with a SQLite database. Hence, we’ll need to install both Dapper and SQLite NuGet packages in the project. To do this, select the project in the Solution Explorer window, then right-click and select “Manage NuGet Packages.”
In the NuGet Package Manager window, search for the Dapper and Microsoft.Data.Sqlite packages and install them. Alternatively, you can install the packages via the NuGet Package Manager console by entering the command below.
PM> Install-Package DapperPM> Install-Package Microsoft.Data.Sqlite
Create a new DbContext in EF Core
The DbContext is an integral component of Entity Framework Core that represents a connection session with the database. Create a new class named CustomDbContext by extending the DbContext class of EF Core and enter the following code in there.
public class CustomDbContext : DbContext
{
     protected override void OnConfiguring
     (DbContextOptionsBuilder optionsBuilder)
     {
          optionsBuilder.UseInMemoryDatabase(databaseName: "IDGSampleDb");
     }
     public DbSet<User> Users { get; set; }
}
Create a SQLite database
To create a new SQLite database, all you have to do is create a new instance of the SqliteConnection class and pass your name for the database as a parameter to its constructor as shown below.
string databaseName = "demo.db";
_ = new SqliteConnection("Data Source=" + databaseName);
Note the usage of the _ (underscore) literal on the left side of the assignment operator. This is also known as a discard and is used to inform the compiler that even if the method returns a value, you do not want to use it.
Once the SQLite database has been created, you can use the following code snippet to create a table in the database.
sqliteConnection.Execute(
    @"create table Author
    (
        ID              integer identity primary key,
        FirstName       varchar(50) not null,
        LastName        varchar(50) not null,
        Address         nvarchar(100) not null
    )");
Figure 1 shows the database and its table created in the DBBrowser of SQLiteStudio.
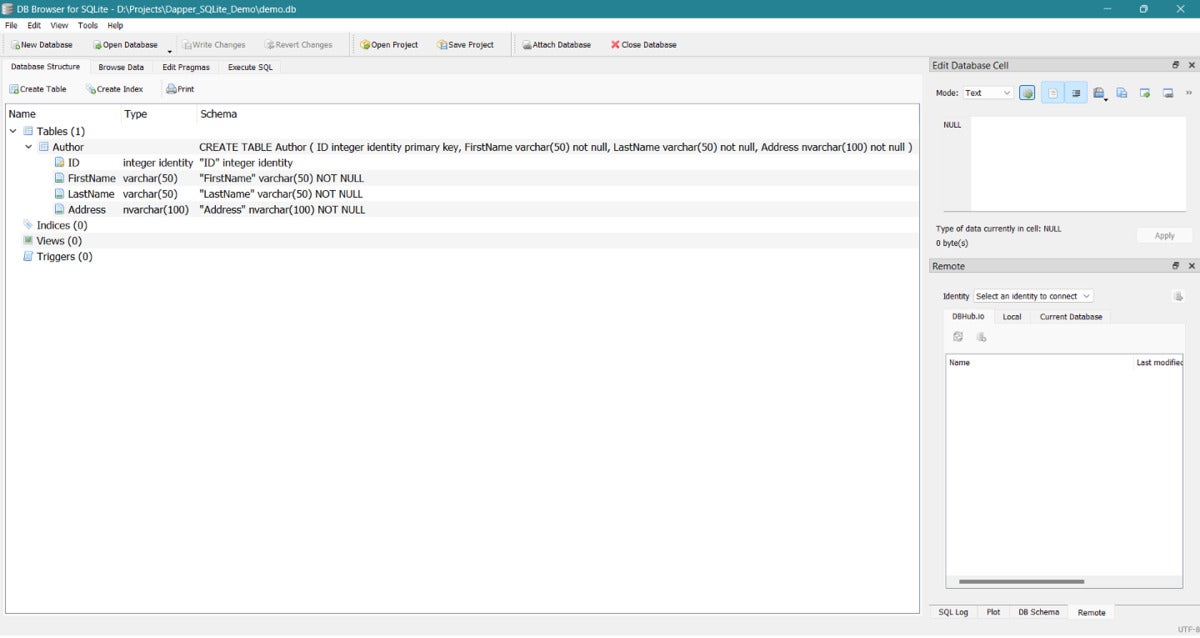 IDG
IDGFigure 1. Our new SQLite database and table.
The following class named CustomDataContext contains the complete code for creating a SQLite database and a table inside it.
using Dapper;
using Microsoft.Data.Sqlite;
public class CustomDataContext
{
    private SqliteConnection CreateDatabaseConnection(string databaseName)
    {
        return new SqliteConnection("Data Source=" + databaseName);
    }
    public async Task<SqliteConnection>
    CreateDatabase(string databaseName)
    {
        using (var sqliteConnection =
        CreateDatabaseConnection(databaseName))
        {
            await sqliteConnection.ExecuteAsync(
                @"CREATE TABLE IF NOT EXISTS
                Author
                (
                    Id INTEGER NOT NULL PRIMARY KEY AUTOINCREMENT,
                    FirstName       TEXT NOT NULL,
                    LastName        TEXT NOT NULL,
                    Address         TEXT NOT NULL
                )");
            return sqliteConnection;
        }
    }
}
You can call the CreateDatabase method of the CustomDataContext class and pass the name of the SQLite database you want to create using the following piece of code.
await new CustomDataContext().CreateDatabase("demo.db");Create an Author repository and interface in ASP.NET Core
Let us now create a repository, named Author, that will comprise two types: the IAuthorRepository interface and the AuthorRepository class. Each of these types will use the Author class as a model. The source code of the Author model class is given below.
public class Author
{
    public int Id { get; set; }
    public string FirstName { get; set; }
    public string LastName { get; set; }
    public string Address { get; set; }
}
Next, create a new interface named IAuthorRepository and replace the generated code with the following code listing.
public interface IAuthorRepository
{
    Task<IEnumerable<Author>> GetAll();
    Task<Author> GetById(int id);
    Task Create(Author Author);
    Task Update(Author Author);
    Task Delete(int id);
}
The AuthorRepository class will implement each of the methods of the IAuthorRepository interface as shown below.
public class AuthorRepository : IAuthorRepository
{
    private CustomDataContext _context;
    private string databaseName = "demo.db";
    public AuthorRepository(CustomDataContext context)
    {
        _context = context;
    }
    public async Task<IEnumerable<Author>> GetAll()
    {
        using var connection = await _context.CreateDatabase(databaseName);
        var sql = "SELECT * FROM Author";
        return await connection.QueryAsync<Author>(sql);
    }
    public async Task<Author> GetById(int id)
    {
        using var sqliteConnection = await
        _context.CreateDatabase(databaseName);
        string sql = "SELECT * FROM Author WHERE Id = @id";
        return await sqliteConnection.
        QueryFirstOrDefaultAsync<Author>(sql, new { id });
    }
    public async Task Create(Author Author)
    {
        using var sqliteConnection = await
        _context.CreateDatabase(databaseName);
        string sql = "INSERT INTO Author (FirstName, LastName, Address) " +
            "VALUES (@FirstName, @LastName, @Address)";
        await sqliteConnection.ExecuteAsync(sql, Author);
    }
    public async Task Update(Author Author)
    {
        using var sqliteConnection = await
        _context.CreateDatabase(databaseName);
        string sql = "UPDATE Author SET FirstName = @FirstName, " +
            "LastName = @LastName, Address = @Address WHERE Id = @Id";
        await sqliteConnection.ExecuteAsync(sql, Author);
    }
    public async Task Delete(int id)
    {
        using var sqliteConnection = await
        _context.CreateDatabase(databaseName);
        string sql = "DELETE FROM Author WHERE Id = @id";
        await sqliteConnection.ExecuteAsync(sql, new { id });
    }
}
Register dependencies in ASP.NET Core
Next, you should register the dependencies with the request processing pipeline so that you can use dependency injection to create these instances wherever you need them. The following code shows how you can register instances of the CustomDataContext and AuthorRepository in the Program.cs file.
builder.Services.AddScoped<CustomDataContext>();
builder.Services.AddScoped<IAuthorRepository, AuthorRepository>();
Create HTTP endpoints in ASP.NET Core
You can now use the following code to create the endpoints to perform CRUD (create, read, update, delete) operations in the database.
app.MapGet("/authors/{id}", async (int id, IAuthorRepository repository) => await repository.GetById(id));
app.MapPut("/authors", async (Author author, IAuthorRepository repository) => await repository.Update(author));
app.MapPost("/authors", async (Author author, IAuthorRepository repository) => await repository.Create(author));
app.MapDelete("/authors/{id}", async (int id, IAuthorRepository repository) => await repository.Delete(id));
And that’s all you need to do. You can now invoke the endpoints as needed. For example, you can invoke the HTTP Get endpoint /authors to display all author records in the web browser as shown in Figure 2.
 IDG
IDGFigure 2: Displaying the author records in the web browser.
SQLite is lightweight, fast, and easy to use, but it has certain downsides as well. It is not scalable or suitable for storing massive volumes of data. For large-scale data storage and high-traffic applications that serve many concurrent users, you should consider a client/server database such as SQL Server or MySQL. But SQLite shines as a development companion—and for use in desktop, mobile, IoT, and embedded applications.
Copyright © 2024 IDG Communications, Inc.
Reference :
Reference link


+ There are no comments
Add yours